I had a 10 inch Dobsonian for a few months before I invested in my observing chair. I spent some time considering my options.
Serious amature astronomers should get a highly adjustable observing chair. There are several available to purchase, but you can also build your own or try using a seat you already have. You can begin observing without an observing chair, but if you are more comfortable you will see more because you will look longer.
If you are more comfortable you will spend more time observing, you will see more detail because you will look longer.
The advantage of an observing chair is the dozens of heights to which it can be adjusted. They can be adjusted up and down with one hand.
Buy a white one, so it’s easier to see in the dark. You will already be tripping over enough stuff. Ask me how I know.
When observing your eyes go through some incredible changes, you can read more about how long your eyes take to become dark adapted, and a test you can do to learn more about your own dark adaptation in this post.
Before I had an observing chair, I had a folding chair, a step stool and I sometimes stood on my lens case. (the Apache 4800). None of these were perfect most of the time.
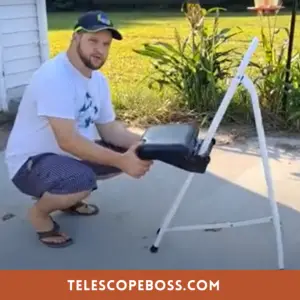
I looked into drum thrones, pneumatic stools from Harbor Freight, DIY plans and adjustable ladders. I eventually settled on the pricey Starbound Observing chair, I bought it on Amazon, you can find all the details here.
I have used it for over a year and I have never regretted the purchase. I love having it for outreach nights so that I can adjust it to fit everyone. It is sturdy enough for kids to stand on as well.

Why do I need an observing chair?
The biggest reason you need an observing chair is because the more comfortable you are while observing the longer you will observe. The longer you observe the greater detail you will observe.
You do not need to buy a chair right away. When you first get your scope there is so much to learn. Concentrate on learning your scope, eyepieces and mount. Once you have fallen in love with the stars, get a quality chair so you can dive deep.
Be careful when transporting your chair. It is pretty big and heavy. The Starbound observing chair that I purchased weighs a bit over 19 pounds and it is easy to pinch your fingers when folding it up.
How much does an observing chair cost?
After buying a very expensive telescope I was super frustrated to find that, in order to fully enjoy it, I needed an expensive chair.
I looked for work arounds, I am a drummer, but my throne was low quality and not suitable for the job, plus I have had two spine surgeries and my back gives out quickly. I am so glad I spent the money, but it stung making the order.
On average a professional observing chair will cost between $150- $200. Some beginners choose to use inexpensive folding chairs, step stools or DIY options, and those are a great way to get started, these cost between $15 and $80. If you are serious about the hobby it is worth it to spend the money on a professional observing chair from a reputable brand.
The brands that offer chairs are Vestil, Omegon and Starbound. These have a few differences, but they are all basically built for the same purpose, to be adjustable and sturdy.
I chose the Starbound because it folds flat and is the easiest to transport. The frame folds and the set folds to the back.
I actually live in a pretty wooded lot. I only have access to a small part of the night sky at home. 90% of the time I travel to observe, so being portable is very high on my list.
Observing chairs do not have to be expensive, you can make your own. The most popular model is called the “Denver Chair” developed by Dave Tropp. He designed it to be simple to build and foldable.
You can find the plans in the second edition Star Ware, a great resource for DIYers and beginners. You can also find the plans on the Denver Astronomical Society website.
He used about $20 in lumber for his original build, but that was quite a few years ago. If you are handy and set up to take on a woodworking project, this might be a good idea.
Here it is in action.
There are a few other options for observing chairs if you are not ready to part with your cash.
What can I use for an observing chair?
When I first got my scope I used a folding chair. This worked to get me started, but I knew I would need another solution.
If you are preparing for your first night out, considerer using one of these:
- Folding Chair
- Stool
- Adjustable Office Chair
- Step Stool
- 5 Gallon Bucket
- Drum Seat/ Throne
- Step Ladder
- Ironing Chair
- Hydraulic Stool
- Standing Desk Stool
- Camping Stool
- Folding Travel Chair
The best chair is the one you have, do not delay starting your observing because you don’t have the perfect chair.
The best observing chair is the one you use.
Make sure that whatever you use can be seen in the dark, and is comfortable for you to sit in.
The more levels in which you can comfortably sit, the better the chair. When you move your scope, to observe different locations in the sky, the height of the eyepiece will change.
At my home I can really only observe the apex, that height is much different than when I am observing closer to the horizon.
If you are observing mostly in the same location, you may find that you only need a few levels.
The best way to find out it to get out and observe.
Starbound Observing Chair
I have mentioned that I have the Starbound Observing chair. I am happy with my purchase, but there are a few things to know about the chair.
The biggest complaint I have is that the metal that holds the seat to the frame bends. It is bent right now.
You can see the issues that I have had with my chair in this YouTube video (that’s really me!)
I have also noticed that the plastic caps that cover the feet of the observing chair come off and the metal tubes fill with dirt. I have to be careful to consider this when packing things up, the dirt from the chair gets everywhere.
Telescope Observing Chair Plans
I mentioned above that there are some DIY observing chair plans online and some in books that are available.
Denver Chair
The most notable one is the Denver Chair. You can find plans for it all over the internet, it does not use friction to hold the seat. There are lots of people who have done modifications to that design.
I was unaware of the Star Ware book, but I put that one on my wish list. I love learning from other star lovers. It contains plans for an observing chair as well as information for beginners who may still be shopping for equipment. Be sure to look for the most up to date edition!
BBCs Version
BBC Sky at Night has another great step by step article with lots of great pictures.
They have a notched back that allows for adjustment.
4 Examples
This post on Cloudy Nights shows quite a few other options for those who would like to build their own.
The builder made 4 types of chairs, the final one and the one with the tutorial uses a plastic stacking chair as the seat!
I am not handy. I knew I would need to buy, but if you got it in you, go ahead and build your own!


